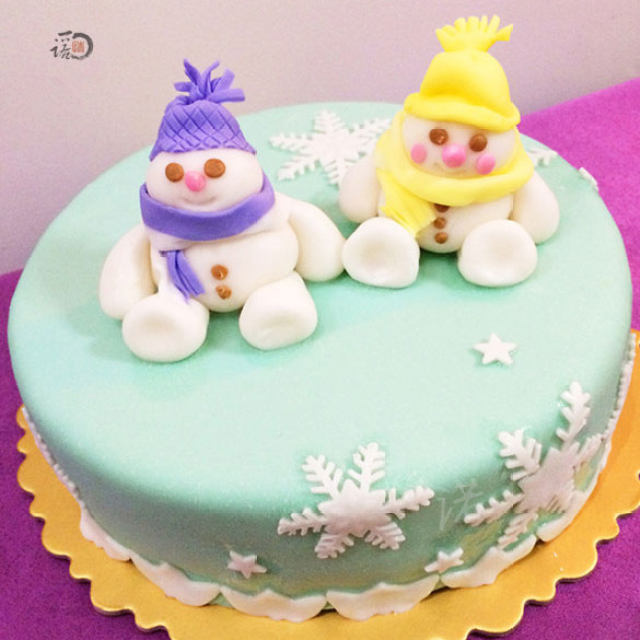
Snow Doll Sugar Cake
2024-08-30 02:59:49 247

Flipped sugar cake, originating from British art cakes, is currently a popular decorative technique. Fantang has excellent extensibility and can be molded into various shapes, as well as completed with the help of molds. Flipped sugar cake has a longer shelf life and a three-dimensional shape compared to cakes decorated with fresh cream. In order to be more detailed, there are more steps to take pictures of this snow doll, so the cake making process is omitted because flipping sugar will have a certain amount of weight. Just pay attention to choosing
Details of ingredients
Technique
Steps to make Snow Doll Sugar Cake
![]() 1. Take the selected pigments and dye the sugar paste into the desired color separately
1. Take the selected pigments and dye the sugar paste into the desired color separately![]() 2. Sprinkle some powdered sugar on the cutting board, apply white oil to your hands, measure the size of the cake, and roll the main color of the sugar paste into slices, being careful not to be too thin
2. Sprinkle some powdered sugar on the cutting board, apply white oil to your hands, measure the size of the cake, and roll the main color of the sugar paste into slices, being careful not to be too thin![]() 3. Gently transfer the sugar syrup onto the cake base that has been coated with cream
3. Gently transfer the sugar syrup onto the cake base that has been coated with cream![]() 4. Cut off the excess parts around with a roller knife
4. Cut off the excess parts around with a roller knife![]() 5. Use a pressure plate to flatten the surface of the cake
5. Use a pressure plate to flatten the surface of the cake![]() 6. Take the original color syrup and knead it into an oval shape
6. Take the original color syrup and knead it into an oval shape![]() 7. Pinch out a smaller piece, as shown in the picture
7. Pinch out a smaller piece, as shown in the picture![]() 8. Use a round headed tool to press it down
8. Use a round headed tool to press it down![]() 9. The body, limbs, and head of the molded snow doll
9. The body, limbs, and head of the molded snow doll![]() 10. Combine them together and stick honey on the joints
10. Combine them together and stick honey on the joints![]() 11. Take colored ones and pinch out the eyes and nose
11. Take colored ones and pinch out the eyes and nose![]() 12. Stick the eyes and nose on the snow doll
12. Stick the eyes and nose on the snow doll![]() 13. Take a piece of purple sugar syrup and roll it flat
13. Take a piece of purple sugar syrup and roll it flat![]() 14. Cut out a small piece and press out the pattern at will, as shown in the picture
14. Cut out a small piece and press out the pattern at will, as shown in the picture![]() 15. Connect and wear on the snow doll's head
15. Connect and wear on the snow doll's head![]() 16. It doesn't look perfect, so I made another tassel
16. It doesn't look perfect, so I made another tassel![]() After sticking it on, it looks much better
After sticking it on, it looks much better![]() 18. Use tools to create a smiling mouth for the snow doll
18. Use tools to create a smiling mouth for the snow doll![]() 19. Rub the purple and white sugar paste into two round strips
19. Rub the purple and white sugar paste into two round strips![]() 20. Arrange them together and roll them into long strips
20. Arrange them together and roll them into long strips![]() 21. Cut tassels at both ends
21. Cut tassels at both ends![]() 22. Around the neck of the snow doll, doesn't it look very warm
22. Around the neck of the snow doll, doesn't it look very warm![]() 23. Using the same method, make him another girlfriend and add a red face to make her a doll
23. Using the same method, make him another girlfriend and add a red face to make her a doll![]() 24. Use a mold to carve snowflakes
24. Use a mold to carve snowflakes![]() 25. Stick it in the appropriate position on the cake body
25. Stick it in the appropriate position on the cake body![]() Finally, add some embellishments around the cake to complete it
Finally, add some embellishments around the cake to complete it


