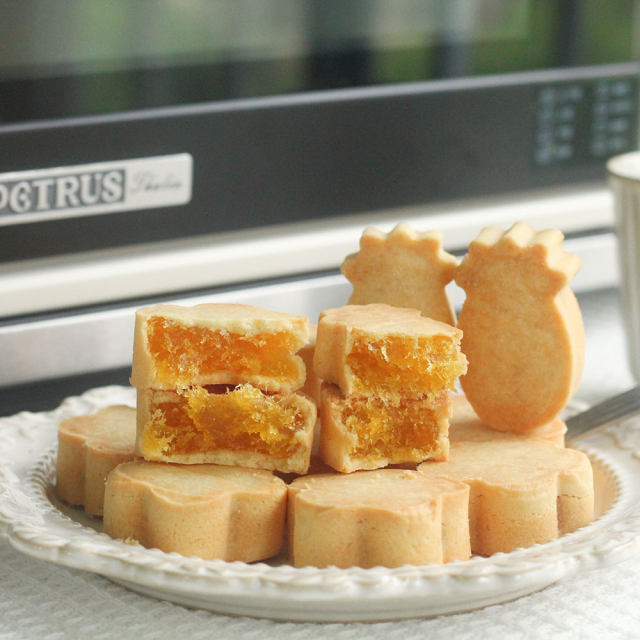
Crispy and crumbly, super easy to handle pineapple pastry, sweet and sour, soft and cute with brushed texture
2024-04-21 21:16:31 656

When I was a child, I craved big pineapple crisps and always wanted to buy them to satisfy my craving. Sour and sweet filling, with a soft and sticky outer skin, really love to eat! I bought some filling and almond powder, so I decided to make more at once and save it to satisfy my craving! The food couldn't stop being delicious. I made 20 yuan, but when I packed it, there were only 15 left! Lin said innocently, "I couldn't help it, it's so delicious!"< Br>
Details of ingredients
Technique
Steps to make Crispy and crumbly, super easy to handle pineapple pastry, sweet and sour, soft and cute with brushed texture
![]() 1. Prepare the ingredients, cut the butter into small pieces in advance to soften and set aside for later use. The butter can be softened during oven fermentation.
1. Prepare the ingredients, cut the butter into small pieces in advance to soften and set aside for later use. The butter can be softened during oven fermentation.![]() 2. Mix low powder, salt, almond powder, and milk powder well.
2. Mix low powder, salt, almond powder, and milk powder well.![]() 3. Clean the mold thoroughly, wipe it dry, and place it on a baking tray covered with oil paper.
3. Clean the mold thoroughly, wipe it dry, and place it on a baking tray covered with oil paper.![]() 4. Soften the butter so that it can be easily scraped open with a scraper, add sugar powder, and stir well with a scraper.
4. Soften the butter so that it can be easily scraped open with a scraper, add sugar powder, and stir well with a scraper.![]() 5. Smooth the electric egg beater and add room temperature egg mixture. Stir and mix well.
5. Smooth the electric egg beater and add room temperature egg mixture. Stir and mix well.![]() 6. Sieve in all the powder, cut and mix until there is no dry powder. If it is not easy to operate, you can wear gloves for easy operation.
6. Sieve in all the powder, cut and mix until there is no dry powder. If it is not easy to operate, you can wear gloves for easy operation.![]() 7. Then put it into a fresh-keeping bag to prevent it from drying out (if slightly sticky, refrigerate for 15 minutes). Pineapple crispy filling (a commercially available mooncake filling that can be stir fried): 25g in flower shape and 20g in pineapple shape. Divide the filling with PVC gloves and knead it into balls.
7. Then put it into a fresh-keeping bag to prevent it from drying out (if slightly sticky, refrigerate for 15 minutes). Pineapple crispy filling (a commercially available mooncake filling that can be stir fried): 25g in flower shape and 20g in pineapple shape. Divide the filling with PVC gloves and knead it into balls.![]() 8. Take 18 grams of skin for floral shapes and 15 grams of skin for pineapple shapes. Roll the pastry into a round shape and place it in the palm of your hand. Use your other hand to press it into a circular shape and place the filling ball inside.
8. Take 18 grams of skin for floral shapes and 15 grams of skin for pineapple shapes. Roll the pastry into a round shape and place it in the palm of your hand. Use your other hand to press it into a circular shape and place the filling ball inside.![]() 9. Gently push upwards with the tiger's mouth, and after closing the mouth, rub it into a round shape to make the crust more even.
9. Gently push upwards with the tiger's mouth, and after closing the mouth, rub it into a round shape to make the crust more even.![]() 10. Slightly stretch it and place it in the mold. Preheat the oven 180 degrees up and down.
10. Slightly stretch it and place it in the mold. Preheat the oven 180 degrees up and down.![]() 11. Use your palm to slightly press down into the mold, and finally use a pressure rod to flatten it. 8-9 minutes full is sufficient, do not be too full as baking may cause swelling.
11. Use your palm to slightly press down into the mold, and finally use a pressure rod to flatten it. 8-9 minutes full is sufficient, do not be too full as baking may cause swelling.![]() 12. Put it into the preheated oven, turn it up 165, down 160, and bake for 30 minutes.
12. Put it into the preheated oven, turn it up 165, down 160, and bake for 30 minutes.![]() 13. Bake for 15 minutes, remove the baking tray, and continue the oven operation. Flip the mold with a food clip and flip it over. Continue to bake in the oven for 15 minutes. Satisfactory coloring is sufficient.
13. Bake for 15 minutes, remove the baking tray, and continue the oven operation. Flip the mold with a food clip and flip it over. Continue to bake in the oven for 15 minutes. Satisfactory coloring is sufficient.![]() 14. Transfer to the cooling rack, cool to hand temperature, and directly remove the mold for easy demolding.
14. Transfer to the cooling rack, cool to hand temperature, and directly remove the mold for easy demolding.![]() 15. Bag, machine seal or seal for storage. Have you seen it yet? Make 20 at a time, keep it and eat slowly!
15. Bag, machine seal or seal for storage. Have you seen it yet? Make 20 at a time, keep it and eat slowly!


![[Anhui Cuisine Cuisine] -- stuffed tofu](/upload/20240404/507817950229561345.jpg)


